 Tensai Academy
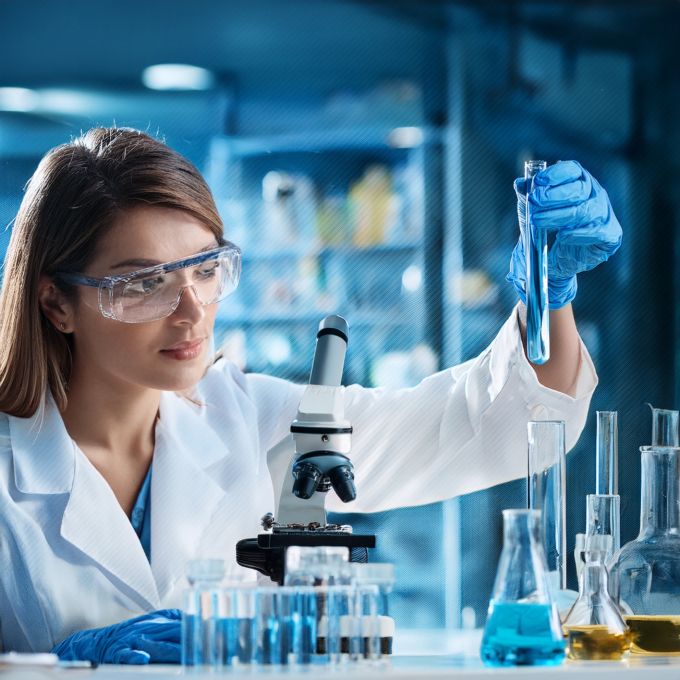
Senior High Lab
You can access detailed lab safety information by downloading the pdf handout linked below
Lab Safety HandoutLab Safety
The Household Hazardous Product Symbols (HHPS) are symbols used on most household products to indicate the safety or hazards associated with those products. Each hazard symbol shows two types of information; 1) The type of hazard and 2) The degree of hazard.
1. The degree/severity of the hazard.
- Yellow triangle: The container is dangerous.
- Red Octagon: The contents inside the container are dangerous.
2. The type of hazard: Chemicals can cause hazards in various ways either as they are, or as fumes emanating from the substances. For example,
- The products smell or taste can cause illness or death
- The product can damage skin and/or eyes.
- The product or its fumes can cause fire.
- The container can explode causing injury.
Workplace Hazardous Materials Information System (WHMIS) contains a wider array of chemical hazards that may be used in an industrial scale or in workplaces. These are the symbols that are used in chemistry. For example,
- Flammable or combustible materials such as gasoline
- Corrosive materials that can damage metals and body tissue such as bleach, battery acid.
- Biohazard - Contains a biological hazard that can cause disease in humans or animals such as pathogenic viruses and bacteria.
- Oxidizing material that may contribute to combustion - such as ozone.
- Toxic substances that can cause effects other than poisoning such as cigarette smoke.
- A compressed gas such as propane. Has the potential to explode the container. Also includes Oxygen tanks used in hospitals.
- Materials that are poisonous when ingested - such as bleach.
Other Considerations
- Dress appropriately: Long pants (trousers) are required, no shorts. Wear closed shoes, not open sandals. Long hair should be tied back and well restrained; in some cases a hair net could be used. A lab coat should be worn and buttoned up. Gloves may be necessary in some cases especially when dealing with hazardous material. Contact lenses are discouraged. Splash goggles may be needed for some experiments.
- Know, beforehand, what the lab experiment will involve. Read all the instructions before you begin the work. Do not perform experiments that are not authorized for that session. Never work alone in the lab and if any accident occurs, report immediately to the instructor.
- No food in the lab: no food, no drinks, no chewing gum.
- Wait for permission before starting the lab work.
- Ensure your work area is clean.
- Be careful and think before you act. Do not run in the lab, use designated aisle spaces to walk. Do not leave experiments unattended. Bring to the lab only those items necessary for the experiment.
- Watch out for the WHMIS symbols: do not smell or touch a chemical until you are told to do so. When smelling a chemical do not place the chemical in front of your nose to inhale. Instead, the proper technique is to cup your hand above the container and waft the air toward your face. When you have to pour substances, do it appropriately and carefully.
- Use the appropriate laboratory equipment. For example if you require heating, use heat resistant pyrex glass, and beware of how to handle hot glass. No not use cracked or broken equipment. Ensure the open end of the tube is facing away from everyone.
- Clean up, when there is a spill, and when you are done with your experiments. Wash glassware and place them in drying racks. When glassware is dry, return to their appropriate storage cabinets.
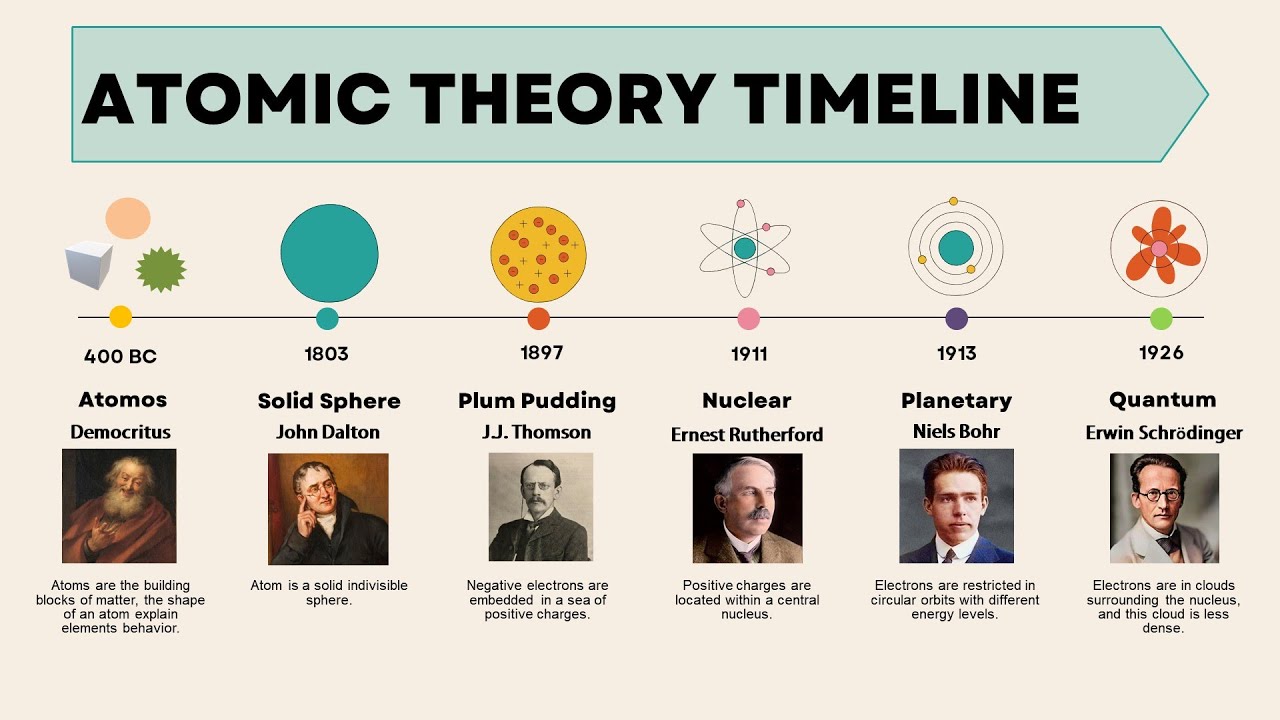
Activity 1: Atomic Theories
Your teacher will split the class into 4 groups and assign an atomic theory to each group. The atomic theories include Dalton, Thomson, Rutherford, or Bohr.
As a group, you need to research about the atomic model assigned to your group. Learn to work as a team. You group will communicate what you have learned in the following three ways:
- A 10 minute presentation.
- A 3D model of the model assigned to you
- A poster summarizing the key points of the theory
Activity 2: Ionic compounds card game
In this activity, you will develop a card game with rules that work for you. This game requires at least 32 cards, each card should have a different element labeled on it with the number of electrons on the outer shell. The game requires that a card played by one player should be paired with another card by one of the other players that when combined together will make the compound neutral. This means your game will be played by at least two people, and ideally, 4 people. You can design other rules for your game as you wish to make it more interesting.
Your teacher will split you into groups. Explain your game and its rules to your team and begin to play. If you notice any discrepancies, you can amend the cards or the rules, as long as you ensure compounds formed are always neutral.
How did your game differ from those of other groups?
What rules did you have to change and why did you need to adjust the rules?
How has producing and playing a card game helped you learn and practise naming rules and formula-writing rules for ionic compounds?
Activity 3: Home-made Indicators
Make a cup of tea but do not add sugar or milk and let it rest on the bench. As you wait for the tea to cool down, pour about 20 mL of grape juice into a measuring cylinder and then add 80 mL of water. Divide this mix into 4 test tubes. Into one tube, add vinegar and record your results. Into the second tube, add ammonia and again record your results. Place one AspirinTM in a plastic bag and crush it to form powder. And into another plastic bag, crush an antacid tablet like TumsTM. Add a bit of water into these powders to make an Aspirin and Tums solution. Add the Aspirin solution to the third tube and the antacid solution into the fourth tube and record your results. Once you have recorded all your observations you can pour these into the sink drain and clean the test tubes and store to dry.
Use the cool tea and transfer 20 mL into two tubes. Into one tube, add lemon juice and record your observations. Into the second tube, add baking soda and again, record your observations. If there is left-over tea, you can test the substances you tested in grape juice, but this time, add them into the tea and record your observations for each.
Explain to your classmates which substances you tested were basic and which ones were acidic.
Activity 4: Observing Surface Tension
Add a bit of water into a beaker only to about 1 cm high. Place a capillary tube upright so that one end is dipped in the water. Record your observations.
Place the end of a piece of glass tubing into the beaker of water. Seal the open end of the tube with the tip of your finger and lift the tube out of the water. Observe and sketch the shape of the meniscus (the top of the liquid column inside the glass tubing).
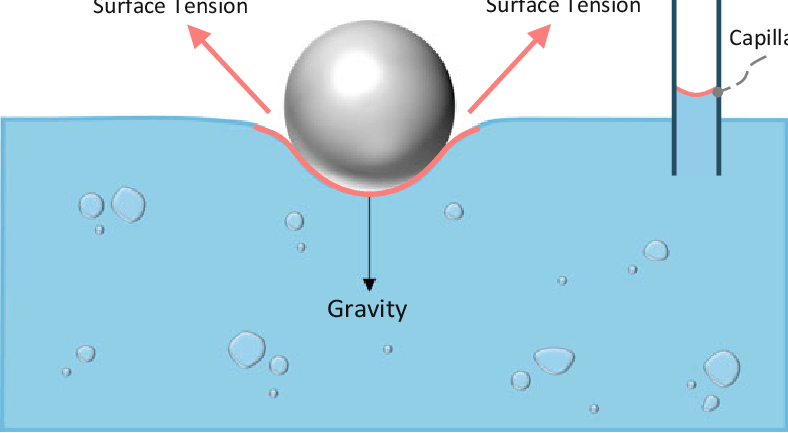
Place a clean, dry penny flat on your lab bench. Draw some water using a dropper then count and record the number of drops of water that you can place on the penny before the water spills over the edge.
Activity 5: Exothermic or Endothermic?
You teacher will demonstrate these reactions. These chemicals are poisonous and we do not recommend students to handle them.
Place about 25 g of iron powder and 1 g of sodium chloride in a resealable plastic bag. Add about 30 g of vermiculite to the bag, seal the bag and shake the contents to mix them.
Pass the bag around the class. Students should hold the bag between their hands and note any changes in temperature.
Pour a very thin layer of water on a wood block. Add 20 g of Barium hydroxide octahydrate and 10 g Ammonium thiocyanate to an Erlenmeyer flask. Insert a stopper and shake the dry mixture until it begins to resemble slush. Place the flask on the wood block for a few minutes and record your observations.
Which of the reactions above was endothermic and which experiment was exothermic?
Activity 6: Standard Chemical Tests
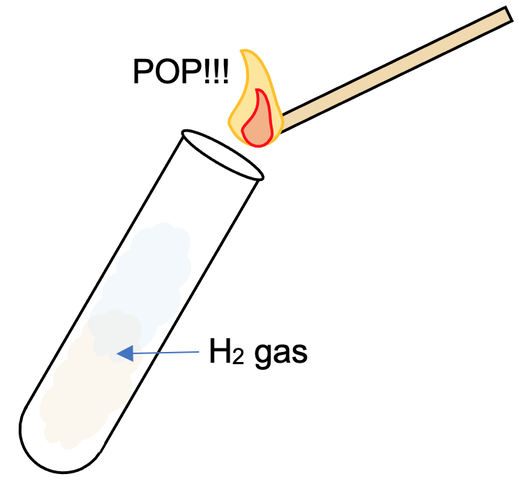
Standard Chemical Test for Hydrogen
Insert a burning wooden splint into a jar that containing the unknown gas. If the gas is hydrogen, you will hear an explosive "pop" sound, and the flame will go out .
If the gas is carbon dioxide, the flame will go out without a 'pop' sound. If the gas is oxygen, the flame will burn more brightly.
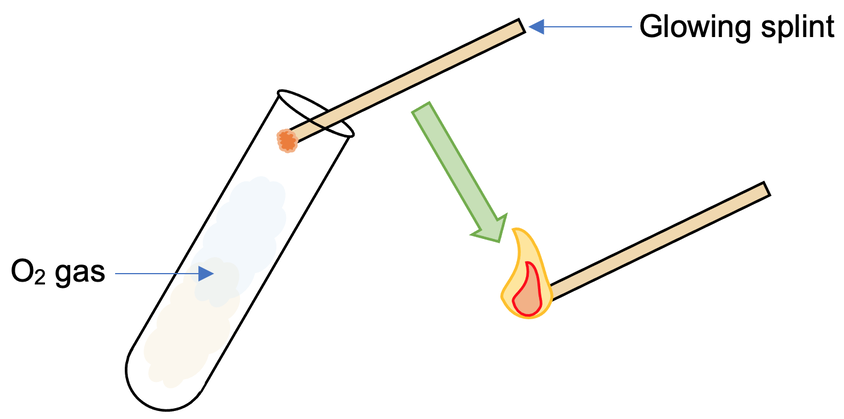
Standard Chemical Test for Oxygen
As indicated above, if you insert a glowing stick into a jar containing oxygen, the flame will burn more brightly. If the gas is not oxygen, the splint will not ignite and may stop glowing completely.
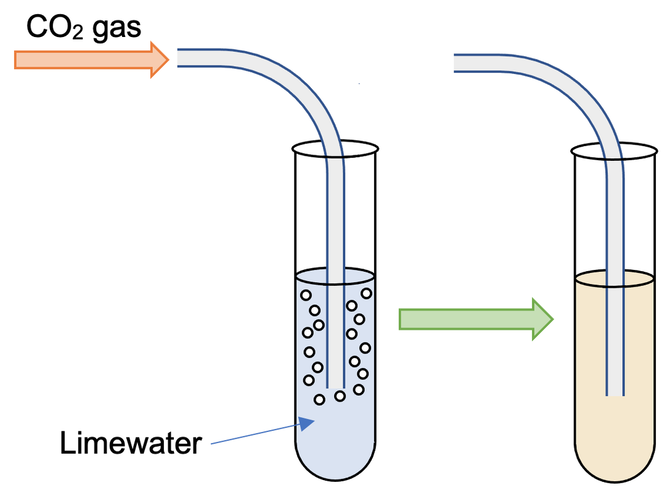
Standard Chemical Test for Carbon Dioxide
The unknown gas is bubbled into a test tube or beaker that contains limewater. If the gas is carbon dioxide, the limewater will become milky. If the gas is not carbon dioxide, There will be no change in the limewater.
Standard Chemical Test for Water
To test whether a liquid is water or contains water, a drop of the liquid is transferred onto the Cobalt(ll) chloride paper. If water is present, the blue cobalt(ll) chloride paper turns pink. If water is not present, the cobalt(ll) chloride paper stays blue.
Activity 7: Moles and Molarity
Avogadro's constant
Count a small number of items and record the number. Measure the mass of these items and also record this value.
Measure and record the mass of an empty re-sealable plastic bag. Fill the plastic bag to the brim with the same items whose mass and count you have already determined. Develop an equation to predict the number of items in the plastic bag (after knowing their mass).
Explain how you determined the number of items in the bag.
Now count the items in the bag to find out the actual number. what is the difference between the actual number of items and the number calculated based on mass?
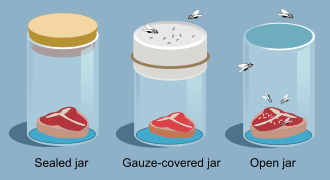
Activity 1: Explaining Spontaneous Generation
Working in a small group, collect information about the ideas and work of Aristode, Redi, and Pasteur. For each scientist, explain the:
Observations
Hypothesis
Predictions
Experimental design
Experimental results
Conclusions
Note that you might not obtain this information for every scientist's ideas. Some researchers used observations only, whereas others used observations and experiments to develop their ideas
Activity 2: Examining Cells - Microscopy
Obtain a microscope slide. Pick two or three fibres from a cotton batting and using tweezers, spread the fibres across the centre of the microscope slide.
Using a medicine dropper, place one drop of pond water in the centre of the slide, on top of the cotton threads and gently place a cover slip. (The fibres will slow the movement of organisms in the pond water).
Study the pond water sample under the microscope starting with low magnification. Observe the organisms move and you may draw them. Increase the magnification and count the number of cells you can observe. If you can now observe the organelles more clearly, you can draw a well labeled diagram.
Estimate the size of the cells by placing a clear ruler along the edge of the slide.
Compare the movement of the different pond-water organisms. What structures did they use for locomotion?
Activity 3: Staining Cells - Microscopy
Use tweezers to gently peel away a thin layer of onion skin. Place the section on a microscope slide. Use a medicine dropper and place one drop of water over the section. Then carefully place the cover slip on the slide and start observing the slide under the microscope.
On a different slide, carefully peel another section of onion skin and place it in the middle of the slide. Place a drop of water as you did in the previous specimen and place the cover slip. Using a different medicine dropper, place one drop of methylene blue (stain) on the edge of the cover slip and allow it to flow under the cover slip until it covers the specimen. You may have to tilt the slide to make the stain flow more easily. Examine the stained specimen under the microscope using low to high magnification. What differences did you notice?
What cellular structures can you identify?
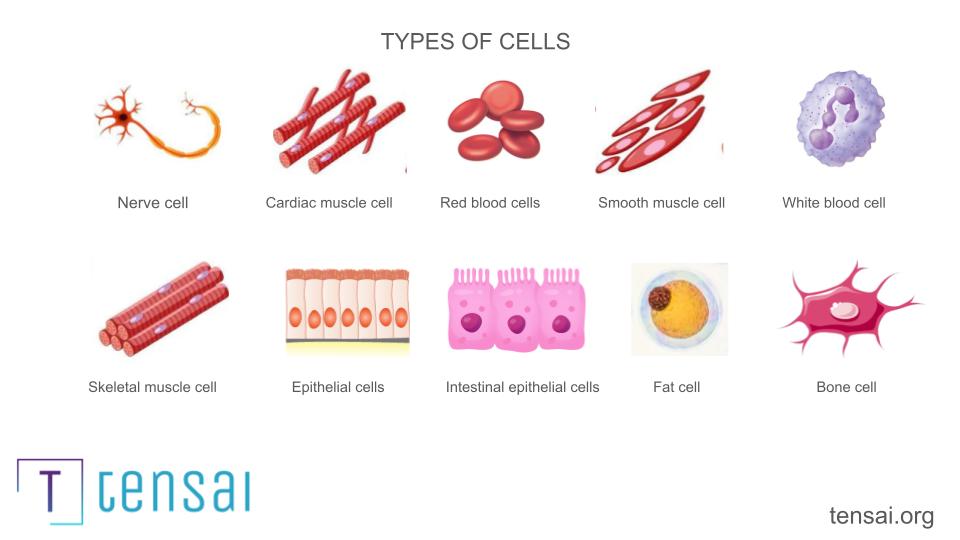
Activity 4: Cell Specialization - Microscopy
Your teacher will provide you with microscope slides previously prepared from different tissues in the body.
Observe each of the slides under the microscope. Identify the cells below on the appropriate slides:
cells of intestinal villi
adipose (fat) tissue cells
root hair cells
leaf spongy tissue cells
Draw two or three of each kind of cell in your notebook.
Activity 5: Assessing Brownian Motion
Place a small drop of water in the centre of a clean microscope slide. Dip a toothpick into the milk, then dip and stir it into the drop of water on the slide. Cover the fluid droplet with a cover slip and use a paper towel to dab away any excess fluid. Examine the specimen under the microscope at low power. Look for fat droplets in the water. Focus and gradually increase the magnification to high power.
Activity 6: Dialysis- Movement of molecules through membranes
Your teacher will provide you with two starch solutions of differing concentration of 100mg/L (solution 1) and 300mg/L (solution 2).
Fill one dialysis tube with 25 mL of Starch Solution 1. Twist the open end of the tube and tightly tie it closed. Rinse the tube with water and dry it using a paper towel. Fill a second dialysis tube with solution 2 and repeat the tying. Fill a third dialysis tube with distilled water and again, tie like all the rest.
In three separate beakers containing distilled water, immerse one tube in each beaker ensuring the whole tube is under the water. record your observations at time 0 and every 15 minutes. You may leave the tubes immersed in water overnight and observe again the next day. Record and report your observations.
Did the observations match your expectations?
What has happened to the starch or water inside or outside the tubes.
Activity 7: Gas exchange in plants
In this activity, you will need to work with a lab partner
Place four test tubes on a rack and label them 1 through 4 using a permanent marker. Fill each test tube with tap water.
Use a medicine dropper to add 20 drops of bromothymol blue to each test tube. Bromothymol blue is an indicator solution that changes colour in the presence of carbon dioxide. High carbon dioxide concentrations produce a yellow colour. Low carbon dioxide concentrations produce a blue colour.
Into test tubes 2, 3 and 4, add 10 drops of carbonated water.
Into test tubes 3 and 4, add a sprig of Cabomba.
Then stopper all of the 4 tubes.
Record the colour of the water in each tube, and then place test tubes 1 through 3 in bright sunlight, and place test tube 4 in a dark location.
Observe test tubes 1 through 3 periodically for 60 min. In your notebook, record the colours of the solutions in the test tubes during this period. After 60 min, observe the solution in test tube 4 and also note its colour. Leave all 4 tubes overnight and record your observations again the next day.
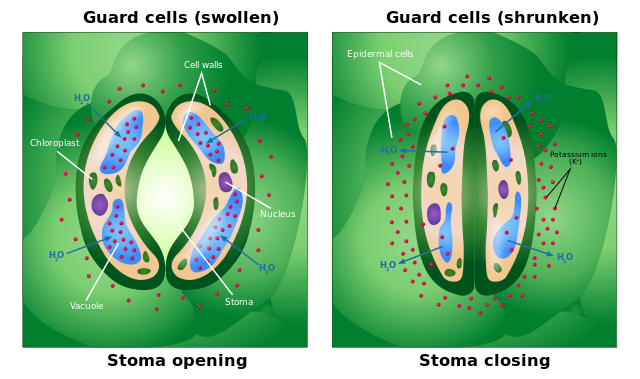
Activity 8: Effect of turgor pressure on guard cells.
Use tweezers to peel off a thin section of the epidermis. Place the specimen in the centre of a slide. Use a medicine dropper to add about three drops of tap water to the specimen. Gently place a cover slip.
Prepare another onion specimen but this time use three drops of salt water instead. Allow the slides to rest for 5 minutes then observe them under the microscope.
Describe the shape of the guard cells in tap water and in salt water. Explain what happened to make the guard cells look different.
Activity 9: Water transport through the roots
Working with a lab partner, obtain one dialysis tube and tie one end tightly with a string. Fill up the tube with concentrated sugar solution. Then on the open end of the tube, insert a glass tube (straw) and tie the tube around the straw. Use a stand and clamp to hold the tube upright in place. Then add distilled water in a beaker to almost full. Immerse the dialysis tube into the beaker and record the level of liquid inside the glass tube every 15 minutes for an hour.
Explain the change in the level of liquid you observed in the glass tubing.
By what process did water flow across the dialysis membrane?
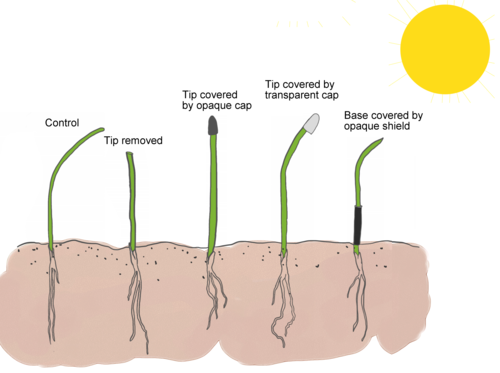
Activity 10: How do plants sense light?
Label four planting pots with your name and place them in a shallow tray. Fill each one about two thirds full with potting soil. Plant seeds in the pots according to the directions on the seed packet. Cover the seeds with soil and water them thoroughly. Avoid disturbing the seeds. Place the pots in an environment with dim artificial light and let them grow for several days.
When they grow to several upright shoots start to prepare the other components of this experiment.
Prepare a three-sided box to place over your seedlings. You can do this by turning an open box on its side, or cut away one side of a box to allow light to strike the plants from only one direction. Cut several squares of aluminium foil to cover the tops of the seedlings. Cut several strips of aluminium foil to wrap around the stems of the seedlings.
Divide the seedlings into four treatment groups. In each group, choose a few healthy sprouts to use for these experimental manipulations. Ideally, select sprouts that are growing straight upward. You can use a protractor here to measure the angles of the plants, this way you will know if this angle changes.
- In the first group, use scissors to cut the leaves from the top of each seedling.
- In the second group, place foil caps over the tops of the seedlings.
- In the third group, place foil tubes around the base of each seedling.
- In the fourth group, do not manipulate the seedlings.
Cover the plants with the three-sided box. The box should allow light to enter from one side only and prevent light froni entering the top or other three sides. Place the plants near a light source such as a window or any artificial light with the open side of the box facing the light.
After about 48 hours, observe the plants and note the direction of stem growth in each group. Use a protractor to measure the angle of the seedlings' growth again and record the data in your notebook.
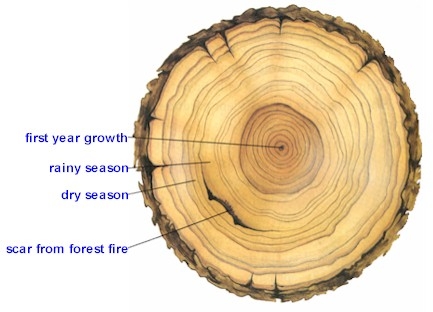
Activity 11: Analyzing Tree rings
Dendochronology is the study that measures the width of annual growth rings in trees. Wet years produce wide rings, while dry years produce narrow rings. Tree rings are also affected by cloud cover, competition for resources, soil nutrients, and pests.
Examine the growth rings of the cross-section. Note that the oldest wood is in the centre. Measure the thickness of several rings near the centre and near the perimeter in your sample. Record the measurements. Wash your hands when you have completed the activity.
Activity 1: Heat versus Temperature
Using the graduated cylinder, measure 100 mL of ice water, without the ice, into a 400 mL beaker. Record the temperature of the water.
Measure 50 mL of boiling water and pour it into a 250 mL beaker.Measure and record the temperature of the boiled water.
Using the beaker tongs, place the 250 mL beaker inside the 400 mL beaker containing the ice water. Record the temperature of the water in the 400 mL beaker every 60 s for 10 min. Stir the water between the two beakers continuously between measurements.
Explain the change in temperature in the larger beaker, the smaller beaker and why you had to stir the cold water often.
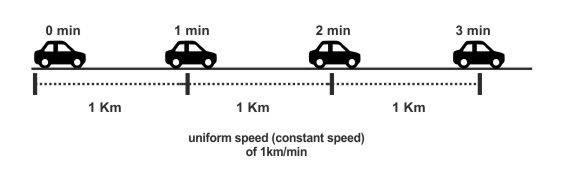
Activity 2: Measuring Velocity
Stretch a paper tape along a table top, and tape it down using a masking tape. Attach a string or wire to a laboratory cart and let another team member set up a stop watch. At the same time as the stopwatch is started, a third student starts pulling the cart at a constant slow speed beside the paper tape. When the stopwatch 6 seconds, stop pulling the cart and calculate the distance the cart traveled using the tape measure. Repeat this several times pulling the cart slowly and measuring the distance travelled in 6 seconds.
Conduct this experiment again with the third student pulling the cart faster, and once again, repeat this experiment several times.
Calculate the velocity of each experiment as the distance travelled / time in seconds. Express the distance in meters so that the units for velocity will be m/s.
To get a clear understanding of an object's motion, especially if it is changing speed and/or direction, you need to determine the object's position and velocity of travel many times as it moves along. The more observations you make, the better you will be able to describe the details of the motion.
Activity 3: Free Fall
In this experiment, you will measure, calculate and create graphs to analyze a free-falling object (steel ball) with a mass of 400 g). The ball is dropped from a height of 2 m and its position and speed are measured every tenth of a second.
Use the data below for your calculations:
| Time | Height | Speed | Gravitational Potential Energy | Kinetic Energy | Total energy |
|---|---|---|---|---|---|
| 0 | 2.0 | 0 | |||
| 0.10 | 1.95 | 1.1 | |||
| 0.20 | 1.81 | 1.9 | |||
| 0.30 | 1.55 | 3.0 | |||
| 0.40 | 1.22 | 3.9 | |||
| 0.50 | 0.73 | 5.1 | |||
| 0.60 | 0.20 | 6.0 |
Plot a graph of the speed of the ball versus time.
Plot graphs of gravitational potential energy versus time, kinetic energy versus time, and total energy versus time. Plot all graphs on the same set of axes.
Explain how the potential energy changes as the ball falls, how the kinetic energy changes as the ball falls and how the total energy of the ball changes as it falls.
Activity 4: Constructing your solar trap
Design a solar trap, present the drawing and a list of materials to your teacher for approval.
Construct your trap according to the approved design including a method for measuring the temperature inside the trap. When your trap is completed, place it in the Sun for 20 min. Compare the highest temperature of each trap developed by your classmates.
Activity 5: Designing a Heat Exchanger
Fill the 1 L beaker about two-thirds full of ice water. Be sure that there is always some ice in the water so the temperature remains near 0C.
Place the beaker of ice water on a raised surface higher than the empty 250 mL beaker.
Obtain a long piece of plastic tubing and make a coilusing the tubingin a way to ensure the coli will be immersed in the ice water. On one end of the tubing (the ice water side), attach a funnel and on the other end of the tubing place a small beaker.
Add 100 mL of room-temperature water in a graduated cylinder and measure and record the temperature. Pour this water gently through the funnel so that it flows slowly through the coils inside the ice water and then flows into the small beaker.
Measure and record the temperature of the water in the small beaker. Calculate the difference in the temperature of the water before and after it passes through the coiled tubing. The coiled tubing inserted in the ice water is the heat exchanger, as the warm water flows through it heat is lost to the ice water cooling it down.
List and explain the factors that you believe would influence the efficiency of the heat exchange.